Starter Kits,Controller Board, Sensor Modules Factory
DIY Educational programmable Robot Projects manufacturer
 |
| Place of Origin: | Made in China |
| Brand Name: | DIY |
| Certification: | CE FC |
| Model Number: | Duemilanove 2009 |
| Minimum Order Quantity: | 5pcs |
|---|---|
| Price: | USD7.85/pc--USD8.9/pc |
| Packaging Details: | special package |
| Delivery Time: | 1-3 work days |
| Payment Terms: | L/C, Western Union, MoneyGram and etc. |
| Controller: | AVRmega328-20PU | Input Voltage (recommended): | 7-12v |
|---|---|---|---|
| Digital IO Pins: | 8 | Analog Input Pins: | 6 |
| SRAM: | 1 KB | Clock Speed: | 16MHz |
| Operating Voltage: | 5V | Flash Memory: | 32 KB (the Other 2k For Bootloader) |
| PWM Channel: | 6 | ||
| Highlight: | diy arduino board,arduino development kit |
||
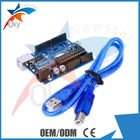
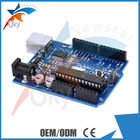
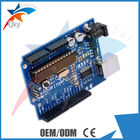
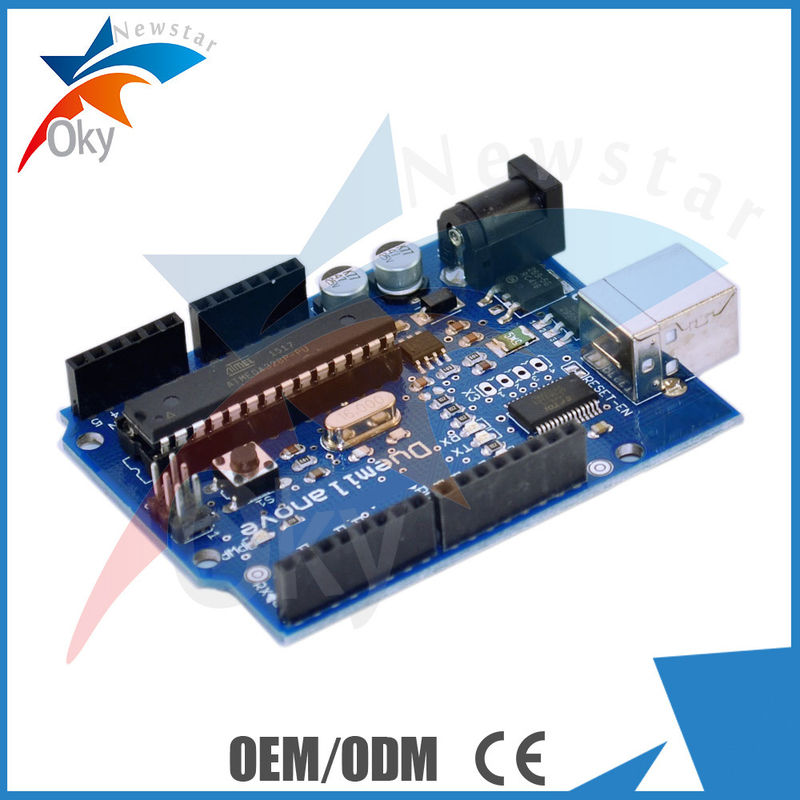
UNO Duemilanove 2009 Board for Arduino Controller AVRmega328-20PU
Specifications:
|
Microcontroller |
ATmega328p |
|
Operating Voltage |
5V |
|
Input Voltage (recommended) |
6-11V |
|
Digital I/O Pins |
14 (of which 6 provide PWM output) |
|
Analog Input Pins |
6 |
|
DC Current per I/O Pin |
40 mA |
|
DC Current for 3.3V Pin |
300 mA |
|
Flash Memory |
32 KB of which 2KB used by bootloader |
|
SRAM |
2 KB |
|
EEPROM |
1 KB |
|
Clock Speed |
16 MHz |
Description:
1. brand new
2. Good condition
3. Good price
The Duemilanove Board Arduino is a microcontroller board based on the ATmega328. It has 14 digital input/output pins (of which 6 can be used as PWM outputs), 6 analog inputs, a 16 MHz crystal oscillator, a USB connection, a power jack, an ICSP header, and a reset button. It contains everything needed to support the microcontroller; simply connect it to a computer with a USB cable or power it with a AC-to-DC adapter or battery to get started.
Test proTest procedure
/*
The circuit:
* LCD RS pin to digital pin 8
* LCD Enable pin to digital pin 9
* LCD D4 pin to digital pin 4
* LCD D5 pin to digital pin 5
* LCD D6 pin to digital pin 6
* LCD D7 pin to digital pin 7
* LCD BL pin to digital pin 10
* KEY pin to analogl pin 0
*/
#include <LiquidCrystal.h>
LiquidCrystal lcd(8, 13, 9, 4, 5, 6, 7);
char msgs[5][16] = {"Right Key OK ",
"Up Key OK ",
"Down Key OK ",
"Left Key OK ",
"Select Key OK" };
int adc_key_val[5] ={50, 200, 400, 600, 800 };
int NUM_KEYS = 5;
int adc_key_in;
int key=-1;
int oldkey=-1;
void setup()
{
lcd.clear();
lcd.begin(16, 2);
lcd.setCursor(0,0);
lcd.print("ADC key testing");
}
void loop()
{
adc_key_in = analogRead(0); // read the value from the sensor
key = get_key(adc_key_in); // convert into key press
if (key != oldkey) // if keypress is detected
{
delay(50); // wait for debounce time
adc_key_in = analogRead(0); // read the value from the sensor
key = get_key(adc_key_in); // convert into key press
if (key != oldkey)
{
lcd.setCursor(0, 1);
oldkey = key;
if (key >=0){
lcd.print(msgs[key]);
}
}
}
delay(100);
}
// Convert ADC value to key number
int get_key(unsigned int input)
{
int k;
for (k = 0; k < NUM_KEYS; k++)
{
if (input < adc_key_val[k])
{
return k;
}
}
if (k >= NUM_KEYS)k = -1; // No valid key pressed
return k;
}
Photos:
![]()
Contact Person: Ms. Erica Teng
Tel: +8613410424757